This site has officially moved! Please click to follow my new site!


Wednesday, December 9, 2015

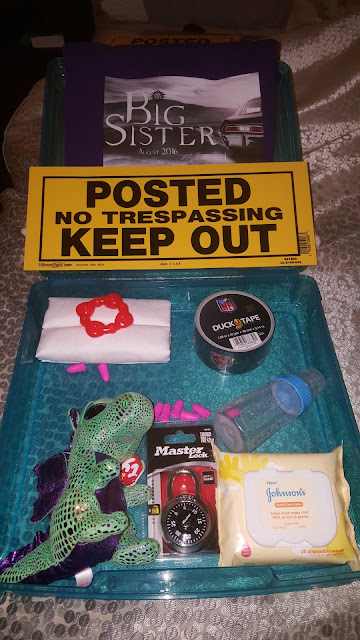
Big Sister Survival Kit

My fiance and I have been together almost four years now and we recently discovered that we're going to be having a baby together. When we got together he already had two daughters and I have one. 

We wanted to make sure that we made our announcement more fun, because we didn't want to tell them "We need to talk" because we felt that it would come off like they're in trouble. 

Pinterest has a million different ideas on how to tell your toddler, kindergartner, overall elementary school aged child about the new baby, but was severely lacking on ways to break the news to your older self sufficient children that there's going to be a new member of the family coming along. 

So, I ended up making my own way instead... 

Fun Way to Tell Your Older Children You're Pregnant

What We Included


1. Personalized big sister t-shirt. I used PowerPoint to make the design and then printed it on Jolee's Boutique Easy Image Iron-on Transfer Paper for Colored Fabrics.


2. A no trespassing sign that we picked up from Home Depot. 

3. A padlock, which we also picked up at Home Depot.

4. Earplugs.

5. Duck Tape. It comes in all different designs now, which we thought would be more fun than traditional duct tape. 


6. A small stuffy from TY. 

7. Baby stuff - bottle, teething ring, cloth diapers, and hand sanitizing wipes - so that they understood what the kit was really about. 


Thursday, October 29, 2015

Harry Potter ButterBeer Muddy Buddies aka ButterBeer Puppy Chow

Harry Potter ButterBeer Muddy Buddies


Our oldest is seriously obsessed with Harry Potter. She has everything from Harry Potter Legos to Harry Potter underwear (I wish I was kidding). In honor of her 21st birthday her bio-mom and I thought it would be great to Harry Potterize her favorite treat. I usually make it for her birthday, but this year it's coming with a twist that I'm sure will thrill her to no end. I can't wait to surprise her tomorrow!!

Usually when I'm thinking about a new recipe, I consult Pinterest. This time, I was sad to only find one other person who has attempted to undertake this Muddy Buddy moderation. I used this fellow blogger's original recipe as the foundation for mine. However, I did adapt it quit a bit.

Please see my original recipe below:

 Harry Potter's ButterBeer Muddy Buddies - Double Recipe

16 cups of Rice Chex
3 cups of Wilton White Candy Melts (regular chips burn easy)
1 stick of butter
1 cup of Butterscotch Syrup
2 tablespoons of McCormick Imitation Rum Extract
Powdered Sugar - enough to dry melted chocolate
2 gallon sized ZipLock bags

First, let me say, the butterscotch was REALLY hard to find! It's not an extremely popular flavor and therefore is not carried in most groceries stores. It took me 3 days of searching to find it. I highly recommend pre-planning and possibly ordering off line if you'd like to make these. 

Step 1

Separate the Rice Chex into ZipLock bags - 8 cups each.
Do not exceed the 8 cups, because you want to have room at the top.


Step 2

Add your stick of butter, chocolate melts, butterscotch syrup, and imitation rum into a pan.
Set your heat on low. This takes a little but, but chocolate burns easy if you're not careful.


Step 3

Continue to stir until all the contents are completely melted together.
The butter will take about 3-5 minutes to melt completely.
The most important thing is to keep stirring the entire time.


Step 4

Ladle the melted chocolate into the bag with the Rice Chex.
Use about half the pot for each bag.
And shake bag thoroughly until all the pieces are well coated.

I forgot to take a photo of the white chocolate at this stage.

Step 5

Add a cup of powered sugar at a time.
You want to continue to shake the bag to coat the pieces.
You will need to add powered sugar until the pieces appear almost dry.
It took roughly 3 cups per bag to accomplish this.

Again, I forgot to take a picture of the white chocolate at this stage.

Step 6

Pour into a bowl and enjoy!

Harry Potter ButterBeer Muddy Buddies

Friday, October 9, 2015

Inexpensive Essential Oil Diffuser


One of the small diffusers that we'd purchased for our daughters died a couple weeks back after only having it for about 4 months. Overall, we weren't that pleased with it anyway because it was only large enough to diffuse for up to 4 hours.

After doing a little research and reading some online reviews, I ended up ordering the URPOWER® Changing LED Diffuser for $24.99 as her replacement.

It rotates between 7 different colors, as shown in the photo, but the best part is that you don't have to turn on the light if you don't want to because it's a separate button from the mist function. We have another color changing one, but you have to press the button several times before the light will shut off, so this is a major improvement.

It also has an automatic shut off function as soon as the water runs out. But the best part is that it lasts 8+ hours so I know my girl is breathing easy all through the night.


Monday, September 21, 2015

How to Transfer a Photo onto a Glass Block... Forget the Mod Podge!

I made several of these personalized glass blocks for my family last Christmas and they were a huge hit. I wanted to share my results for anyone looking for a unique and relatively inexpensive gift idea.

Originally I had started this post with a step by step process on using Mod Podge Photo Transfer Medium. Turns out, you're required to own a laser printer in order for this to work properly. Sorry Mod Podge, but all I have is your standard affordable inkjet kind. It would have been nice if they put it on the bottle that it was necessary instead of just recommended.

 In the beginning I was extremely excited by this project. Getting gifts that my family doesn't just go and out and get themselves is hard and I thought putting a photograph on the square glass craft block was something no one in my family would ever think of (because no one in my family is exceptionally good at crafts, especially me). Two days in I was ready to be done with this nightmare!

See, it takes a little over 48 hours for Mod Podge to dry after application. And that's IF the temperature of your home is perfect. It can't be too cold, too hot, too damp, or too dry or it takes even longer (that should have been my clue right there this crap was tricky). But of course, I'm nothing if not determined so I applied it to my printed inkjet copy and waited for grass to grow for it to be completely dry. After the 24-48 hours waiting period you then dampen the paper and "simply" peel it off.

First of all, there is nothing simple about getting the printer paper off the damn block. It sticks like glue, peels the Mod Podge medium if you rub to hard, and drys too quickly which necessitates wetting it repeatedly which results in over saturation and smeared ink (this is probably why the "recommend" using a laser printer).

After a good 20 minutes of peeling off the soppy paper, my end result looked like this:


The photo isn't the least bit clear and if you look close enough you can see where not all the paper fibers came off. It took a total of 3 days just to get that and all I had to show for it was blue fingers and a foggy photo. I was more than disappointed, I was pissed!

After seeing this, I ended up researching alternatives well passed midnight. Some people recommended a product called Liquitex Professional Gloss Gel Transfer, which essentially is a different type of Mod Podge. There was no way I was doing that again! Other people recommended printing on vellum paper. However, after looking into it more closely printing on vellum is tricky. Not all printers will actually do it, since it's basically a water resistant tracing paper that's not actually meant to be printed on. That didn't seem like a really good idea to roll the dice on.

Time was running out, since we're leaving today and it took me until Wednesday to figure out Mod Podge is a joke. In the end, I went over to Office Depot on Thursday and found a wonderful printer friendly product.... WINDOW CLING! If I had just been smart enough to visit my local office store in the first place, it would have saved me a ton of time and a migraine.

So if anyone is looking to do something like this, please just order yourself some printable window cling sheets and save yourself a boat load of stress. You'll actually get the results you're looking for with essentially no hassle...

Transfer Photo onto Glass Block